Water Kefir Step-by-Step Guide
 Welcome to the kefir family! If you haven't already, you can purchase Water Kefir Grains from our store. You are now part of a world-wide community that has sustained this delicious health-promoting drink over many centuries.
Most fermentations, including water kefir, do not do particularly well with metal utensils or metal containers which can damage them.
It is recommended to stick with
glass, wood and plastic when handling and fermenting. Stainless steel is considered safe for short term contact such as straining or stirring.
If you hate details and want to get started right away, try our water kefir quick guide!
View the printable PDF version of this guide.

PREPARATION
 *When your package arrives, we recommend putting it directly in your fridge temporarily, until you're ready to feed the grains (preferably the same day, or within 24 hours)
Utensils needed:
• Quart or larger jar
• Wood or plastic spoon/spatula
• Plastic/nylon or stainless steel strainer
• Another quart-size or larger container to store the finished kefir. (a clean pop, juice, vinegar or oil bottle works great, too).
Ingredients needed:
Tap water can work fine if the chlorine level is low enough. Many people have no issues using it. If you're concerned, letting it sit out (open, no lid) 24 hours allows chlorine to evaporate. Chloramine (another form of chlorine sometimes used to treat water) does not evaporate though. Tap water is worth experimenting with after you have acclimated your grains to your home for a week or two.
We recommend starting out with spring or mineral water and then testing on back-up grains with your tap or filtered water before using one type exclusively.
NOTE on Other Liquids: Hold off on experimenting with other liquids such as juice or coconut water until the grains have balanced for a couple weeks in their new home. Trying to use these right away can sometimes be a struggle for the grains coming out of transit.
We also offer sugar bags in our store that has all the sugar & mineral requirements needed for a quart sized batch.
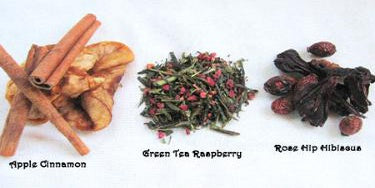
Optional items (with caveats): (as shown in green square above)
 Muslin bag: to hold your grains or dried fruit in during the ferment. This is somewhat convenient for keeping the grains separate from the fruit, but isn't necessary. Keep in mind it can sometimes hinder the grains access to nutrients a bit, too. This functions best for holding small fruits, teas, herbs or fruits that flake as they hydrate (like dates or seedy figs) that you may eventually experiment with in your water kefir. Cheese cloth can also work very well, and is more porous. Avoid nylon or other plastic mesh bags - which can leach plastics as they interact with the acids in the ferment.
 Dried unsulphured fruit: Fruit adds to the flavor and nutritional dimension of the beverage. They are especially helpful if you're using only white sugar, as the dried fruit supplies minerals that processed, white sugar lacks. Using dried fruit with unrefined (brown) sugar can be 'overkill' and can lead to yeasty or even slimy ferments (too much yeast and/or minerals is the likely culprit). Use small amounts to find the threshhold of tolerance. If it seems too much, simply cut back or omit next time, the grains will re-balance. Avoid sulphured fruit (a preservative added to most dried fruit that can suppress or highly irritate the grains). A handful of dried fruit per quart is sufficient (see pic below, including note on 'amount of dried fruit'. Cutting up the dried fruit can help release more nutrients and flavor.
 Lemon: This is truly optional, and only works for some people (depending on local water mineral composition and other ingredients used). Many times it can be irritating* (but not detrimental short term) for the grains. If you decide to experiment, use a small wedge, and simply place it in the ferment (don't squeeze the juice in). Organic is best, washed well, if non-organic or unsure of cleanliness, just peel the rind off (which contains waxes, chemicals etc). Some people like the flavor this lends, some don't. Sometimes it can help with the ph of the ferment as well, depending on your water and other ingredients you're using.
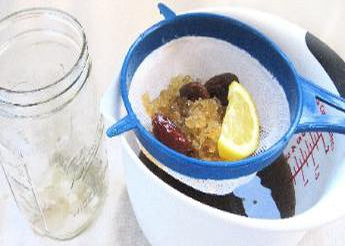
 *If you like the flavor, but your grains are irritated by it (grow less, crumble a bit, acquire a dusty coating) simply stop using it in the ferment (the grains will recover), and add a little slice or squeeze into your strained, bottled kefir to flavor it. (as pictured above)
Amount of Dried Fruit: You can visually get an idea here of about how much a 'handful' is. You can get by with less than this, too. The fruits pictured work well with water kefir, either by helping nourish the grains, lending a great flavor, and in many cases, both.
NOTE: We have found some fruits like dried strawberries just don't do much for the flavor OR for the grains. Raspberries on the other hand, work very well for flavor (but don't help the grains much...and dye them temporarily). Banana can be ok, but is sometimes a bit 'oily' and doesn't lend as much flavor as you'd think. Keep in mind some of these fruit will dye your grains a bit! But the dye is temporary - it will fade when you stop using the 'culprit' ingredient. Usually pink and red fruits are the ones to dye.

A Note on Fresh Fruit: Fresh fruit is tricky and can irritate the grains (enzymes, antibacterial properties, weak organic acids). Most people find this works exceptionally well after fermenting. Simply add fresh fruit, or fresh fruit juice of your choice to your strained, bottled kefir to flavor it. You can temporarily ferment juices such as grape or apple, but over time it can be irritating to the grains. Store bought juice is pasteurized and contains preservatives, both of which really reduce the effectiveness of the ferment. We encourage you to experiment with fresh juice (freshly squeezed 'raw' apple cider or blend up some grapes in a blender to make your own grape juice!
STEPS
1. The first step is to strain your grains and discard any sugar-liquid in the bag. While they are still in the strainer, lightly pour some spring, filtered or mineral water over them to give them a quick rinse. Don't worry about making them 'pristine', a quick gentle rinse is sufficient.
CHLORINE: Chlorine can damage the kefir grains, which is sometimes found in high amounts in tap. Please refer to the section above on water under 'Ingredients'.
METAL: If using a metal strainer, stainless steel is considered safe for brief contact. Acids from cultures can interact with and leach metals (though mostly through prolonged contact), which could disrupt or harm the grains.


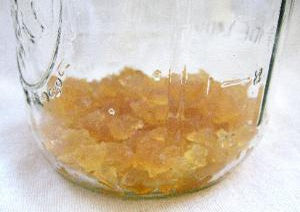 2. Now, place your rinsed grains in a clean jar that holds at least four cups (a quart) of water to start out with. It doesn't really matter whether it's a skinny or a wide jar, but we have found that the kefir grains do a little bit better in a wide jar simply because the surface has more air exposure.
 3. For this first batch, add 4-6 tablespoons (1/4 - 1/3 cup) sugar of your choice (white, brown, raw or a mix of them). Here are some great sugar combination guidelines:
• 40-80% white sugar + remaining % unrefined (brown, rapadura, etc) sugar
• 80% white sugar + 20% molasses
• mostly white sugar (roughly 80-90%) with the small remainder a mix of dried fruit + celtic or himalayan sea salt and drop of molasses
• a blend of mostly white sugar, a very small bit of unrefined sugar (a spoonful), and 1-2 small dried fruits (like 1-2 apricots).
SUGAR: White cane sugar is the most affordable, and does not overwhelm other flavors that you may wish to add later when bottling. We recommend using white cane sugar for at least approx. half of the sugar and, if desired, supplement the rest with a form of less refined sugar such as whole cane sugar, palm (coconut) or blackstrap molasses for additional mineral support. Molasses can be quite strong flavor wise, so try experimenting with other unrefined sugars, dried fruits and/or salts to perfect your flavor preferances. We have found that the grains do best with access to dense caloric sugar (white) supplemented with a smaller portion of high mineral (less refined) sugars and/or dried unsulphured fruits. It is hard to have a ferment do well on white sugar alone, unless your water is very rich, and the ph is right.
HONEY: It's best to hold off experimenting until after you've had the grains for a few weeks in a 'normal' sugar (as listed above). You can try honey but it is cautioned that due to its antibacterial properties (especially raw), and different ratios of sugars (higher amounts of fructose) it may do poorly or temporarily weaken the grains. We highly recommend experimenting, there are SO many sugar and dried fruit options. But, we stress waiting to do so until you have enough extra grains to experiment in a separate jar. Check out our section on sugar types in our Water Kefir FAQ for more sugar ideas and info.

 4. Add 4 cups of spring or mineral water. Be sure to allow 1" or so space at the top (don't fill to the brim). Cold, cool or room temperature is best (never hot). Stir with a wooden or plastic utensil until the sugar is mostly dissolved. This will only take a minute or two, as it doesn't have to be perfect. You can dissolve sugar in boiling water ahead of time, as long as it's cool before using.
 5. If you are adding a lemon wedge (can be irritating for grains, please read about lemons under 'optional items' above), its easier to do so after stirring. At this point, you can add a lemon wedge (anywhere from 1/8 of a lemon to a half lemon). If you're unsure what may be on the lemon (wax, chemicals, etc), simply peel the skin off. It's not advisable to squeeze the lemon, but you can do this at the end after you've strained out the grains (when you are ready to bottle and/or drink it), if you prefer a stronger lemon flavor.
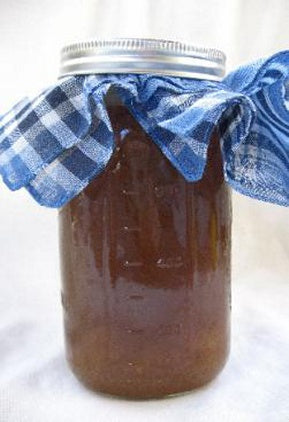
6. Cover the top of the jar with a cloth, paper towel or parchment paper held by elastic. This is so your kefir grains can breathe while at the same time protecting it from contamination like dust and fruit flies.
LID: Putting a tight lid can cause the jar to explode due to the natural carbonation process taking place. Believe us, this does happen! A loose lid can work ok, but cloth is best. Air locks work just fine too, if you prefer to use those.
 7. Time to let them rest and do their thing! Find a place for your grains out of direct sunlight. We have personally not found direct sunlight to be harmful, but it's the common suggestion to avoid it. Store your ferment in the dark or natural light (just not in a beam of sunlight). The counter or a cupboard is just fine. You can shake/stir them once in awhile as they ferment (helps redistribute nutrients). Although sometimes helpful, its not completely necessary and doesn't usually make a huge difference for water kefir. Check back on them in about 48 hours (2 days)! Two days is always the recommended time for water kefir. In the summer they may be done before that, but it's nothing to worry about. In the winter they can go longer, 3-4 days even if your house is on the cool side, but you will learn as you go... it's not critical to get just the right time, so just experiment as you go, finding when it seems about the right sweetness to you.
TEMPERATURE: Temperature can greatly affect the speed of fermentation (it can take half as much time during the summer). Experiment and see what tastes right (and digests right) for you. They will not die if they're ready at 24 hours, but you strain at 48, so don't worry too much!
Activity and Bobbing Grains: If you jostle the jar or lightly tap it against the counter you may see some tiny fizz that raises to the surface. You most likely will not witness bubbles without disturbing the jar in some way (your ferment will not look like a bubbling fish tank!). This is a good indication of proper activity. It's sometimes normal to see grains traveling up and down while fermenting, but it's also normal to NOT see any movement. It's not an indication of a poor ferment if they are not moving (unless all other factors of failure to ferment are present). In fact, most of the time, they do not bob or travel. When the conditions are just right (you may find in a particular season, with a certain amount of sugar, and certain ingredients) the grains will grow and ferment in such a way that their shape traps carbonation bubbles in their matrix temporarily, which is what lifts them up, and then eventually the gas dissolves and they sink back down again. But it sure is fun to watch, when the phenomenon does occur!:)


INACTIVITY: If your grains are not doing well (ie, no ferment, disintegrating), they most likely need more mineral support. We recommend trying a different recipe (as suggested in step 3) which may be all you need to get them going. Problems usually arise under 2 condtions: too many various unrefined ingredients given to them right away (after arriving at your house, they are slow metabolically and this is too much to process) or if they aren't given enough minerals (such as just white sugar and a lemon). The grains are hardy and will almost always perk up even after several ferments fail - you are not really on a time clock, they're quite patient, so try a different combination and go from there!
8. When the kefir is ready, you need to separate the water kefir from the kefir grains. Set a plastic or stainless steel strainer over a jar or bowl and pour everything in. Pick out any fruit or lemon. You can eat these, discard, or even keep in your bottled water kefir. You can also re-use dried fruit for one more ferment if desired. If you used lemon, you can squeeze it into your strained/bottled kefir for a stronger lemon flavor if desired.

SURFACE: It's normal to see some grains, the dried fruit, foam and occasionally some 'scum' floating near the top (especially when using less refined sugars and/or dried fruits). It's also normal to see a perfectly clear surface, too. Sometimes this can indicate inactivity though - taste to see if it still tastes like flat, sweet sugar water - this indicates the grains did not convert much of the sugar. A great way to understand your ferment better is to taste everything before the ferment begins, so you know what an unfinished ferment tastes like, and then compare it at the end of the 48 hours - there should be a difference, explained below:
FLAVOR: Water kefir is milder than kombucha, but should still have a noticeable flavor change - like a weak apple cider. Carbonation is usually very subtle (if present at all, at the time of straining) but will increase when bottled (more on this below). Carbonation always rises - and with a cloth lid, most of it is escaping during the ferment. So when you go to bottle your ferment, put a very tight lid on it, and see if any carbonation develops. If not, adjust by adding a teaspoon of sugar or a little fruit juice when bottling - this should give it a good kick. You may also need to experiment with storing it for a day or two outside the fridge, vs inside the fridge (just keep it in a box or bag outside, in case it explodes! Using swing top bottles helps because these withstand greater amounts of pressure than other bottles or jars.
 9. Now its time to bottle your strained water kefir and put the grains back into their jar. Measure out 1/4 cup of grains and place them back in your jar (does not need to be washed each time), or a clean jar. In the 'Extra Grains & Storage' section below you'll find ideas for what to do with extra grain growth. Now pour your strained water kefir into another jar to store. Clean pop, juice, vinegar or oil bottles work great. Glass is the preferred storage material. Plastic and metal tend to leach when in contact with acidic liquids. You can drink it right away or chill it. Water kefir tastes best (in our opinion) within 48 hours of being chilled, and begins to diminish in flavor past a week (continues to convert to a more acidic, higher alcohol beverage).
 EXPLOSIONS: When storing, try to keep the lid on a tad loose, to prevent explosion. If you're aiming for more carbonation, fill the bottle within 1/4" of the top, and put the lid on tight, but 'burp' it each day (open the lid, then close back up) - this prevents explosions but still allows carbonation to build up.
FIRST FERMENTS: Occasionally, the first batch or two will have an off odor. Although generally safe, you may want to discard the first few batches. Although usually fine upon arrival, its good to let your grains acclimate to your home, water source and sugars and become fully balanced before regular consumption. If it has a strong 'nail polish' odor, wait until they balance. If it persists, rest your grains in clean water in the fridge for a couple of days, changing out the water daily. For other tips and info on water kefir visit our FAQ

FLAVORING: Half the fun of water kefir is flavoring. When you've got it strained and bottled, you can experiment with many different flavors and techniques. Add in some of your favorite fruit juice, veggie juice, or squeeze in some fresh lemon, lime or orange. You can even add fresh or dried fruit. Raspberries are delicious. A teaspoon of vanilla extract (per 1-2 cups), a stick of cinnamon, or some fresh slices of ginger are excellent as well.
 Grape juice is outstanding and gets it quite fizzy, too. Let the flavors meld, we like to let ours chill up to 2 days for maximum impact! Sometimes this process is called the 'Secondary Ferment' because it is without the grains, where you are adding in more sugar and/or fruit and flavors, and letting it further ferment a day or two. The reason to add more sugar is to aid in carbonation. Fruit juice also works great for adding carbonation (with no need to add extra sugar). You can let it rest at room temperature or in the fridge for this process (just make sure to 'burp' the bottles, especially if left out of the fridge. For special bottles like the one above (which don't explode as easily as normal jars and bottles), view our swingtop bottle page.
Important Note Before Drinking Kefir: Kefir contains very large amounts of good bacteria and yeast as well as being acidic (from the high amounts of healthful lactic acid, ph around 3-5). For a few people's bodies it can be a little bit of a shock. Everybody reacts to it differently, so we always recommend starting out slow to see how your body takes to it. The majority of people do not have any adverse reaction, but if you do, usually it's just a matter of starting out slow and slowing increasing over time. Start with a tablespoon and go from there. If you are sensitive to sugar and tiny amounts of alcohol, it is generally tolerated better on a full, rather than empty stomach, such as after lunch.
NOTE: When people say they are drinking kefir, they are referring to the liquid created. However, it is fine to eat small amounts of the grains themselves, too, which are of course an excellent source of probiotics.
10. Now simply repeat! That's it! Congratulations on your first home-made water kefir! It really is a fool-proof process and the grains are quite resilient, so don't worry too much, people have been making this for centuries! Have fun, experiment and enjoy!

If you need any further help beyond this guide, feel free to email us at any time at yemoos@yahoo.com.Additional Thoughts and Tips
Concerning the next batch: It is just fine to start with the same jar (can be reused for several weeks if desired), or a clean jar and all new ingredients (as described in the steps above). Some people like to carry over a little of the kefir from the last batch (1/4 cup per quart for example) to the new batch. While this is not necessary, it may sometimes help with the ferment. Try with and without to determine in your situation if it has any helpful results.
Concerning 'Secondary Ferments': To avoid harming the grains, a majority of flavoring is done in a 'secondary ferment'. This is after the grains have been taken out and you are bottling. You can add whatever flavors you want at this point, without any worries as to harming your grains. Remember that adding fruit juice or sugar only temporarily increases the sugar content and after leaving it for a day or two a portion of the juice or sugar will be converted (even without the grains, water kefir is full of probiotics able to metabolize sugars. Be sure to keep the lid on a bit loose to avoid explosion. If you want good carbonation, invest in a swing top bottle (withstands pressure, so you're less likely to be dealing with an explosion!). You can also just stick it in the fridge, the flavor will slowly infuse the liquid, even when cold. There are limitless combinations you can try with this! Included at the end of this guide are just some of the delicious combinations you can try in our Recipes Section!
Extra Grains and Storage
After your first few batches:
As you continue to make kefir, your grains will grow. At that point, you can either add more sugar-water if you want more kefir, eat them or store them (it's always a good idea to have some back-up grains on hand). They also are a good addition to a compost pile! :)
Eating the grains is another way to get a mega dose of probiotics. Start with a very small amount of balanced, healthy grains and see how your body responds. Unlike milk kefir grains, these are rather bland and flavorless, but have a fun crumbly rubber texture. We still like eating them ourselves once in awhile (as do our dogs and chickens!). You can also blend them in with your kefir or kefir smoothies (throw in some bananas and strawberries for fun!). Everyone is different and some people may be sensitive or not quite use to the sheer number of good bacteria and yeast contained in the grains. As with all things, listen first to your body.
How to store your extra grains:
Freezing - best for medium to long term storage
Freezing is not the best option for water kefir, as long term storage in the fridge is quite successful. But if you prefer, here is what to do! To freeze, rinse your grains if you wish with water (no chlorine, no heat) and then gently pat them dry with a clean cloth or paper towel. You can take them directly out of a finished batch of kefir and just pat them dry of kefir (they will be more sticky, but rinsing is not absolutely necessary).They will still be damp, now take them and roll them in a bowl of sugar until well coated. Then fill a freezer bag or jar with a generous amount of sugar and bury them in it (to protect them from air, moisture and freezer burn). You can also try freezing them directly in their water kefir jar, but it is more damaging, since the water expands as it freezes. If you want to freeze multiple batches of kefir grains in water kefir, simply place a few grains in each cube of an ice cube tray, fill with kefir and let freeze on a flat surface. Then pop them out into a freezer bag within a day or two and store for about 3 months. Dom, a kefir-guru recommends grains spend no longer than six months in the freezer. However, some have had success reconstituting frozen grains after more than 2 years (though we can't say what the quality or health of the grains were at this point!). If you have a self-defrosting freezer, you can try freeze-drying your grains at home. Try to start with small grains of uniform size (gently separate larger grains with your fingers to make smaller if necessary). Place your grains on a porous, non-metal surface, such as some nylon suspended above a cookie sheet. Allow them to freeze openly in your freezer for about 3-5 days. This will only work in a self-defrosting freezer that is able to wick away moisture as they freeze, allowing them to dry. When they are dry, store them buried in sugar in the freezer (in a jar or bag) or in a vacuum-sealed bag.
Dehydrating - best for long term, convenient and/or transportable storage
1. Pat your kefir grains dry with a clean cloth or paper towel. You may rinse them ahead of time if you wish In chlorine-free water.
2. Lay out on a clean surface. A cloth or paper towel works well for non-fan drying, a plate, wax paper or any clean surface (non-metal) works fine for forced air drying. Skip to step 6 if you have a fan or dehydrator.
3. If you don't have a fan, cover loosely with paper towel to protect them as they dry, this will take about 2-5 days, depending on room temperature and humidity.
4. Check them as they are drying, flipping them around half-way to expose the damp parts near the bottom.
5. If you have a fan, lay them out as mentioned in step 1 and angle a low or medium force of air towards them (just be careful not to blow them away!). If you have a dehydrator that can do 80°F or less, than this is an acceptable method as well. They will dry in about 12-48 hours, depending on room temperature and humidity.
6. You can stop the drying when they appear almost dry but are still barely squishy if you are storing them for a short period of time (such as a week or two). They are slightly more active and fresh in this state. Otherwise proceed to the next step.
7. When the grains are completely dry (hard, small, and depending on sugar, either clear or a shade of light to dark brown) put them into a plastic bag or jar with cotton balls (to absorb excess moisture) and store them at room temperature or in the refrigerator. You can also store them in a paper envelope, inside a jar OR coated in milk powder in a bag or jar. Dehydrated grains can successfully be reconstituted after a year or more.
Refrigerating - best for temporary storage
If you need to store them temporarily, you can always put them either in their own kefir or in a little plain water (or even in some sugar water, similar to their recipe) in the fridge. The colder temperature will greatly slow the fermentation process. This is the best method of storage if you're planning to take a break of about a month or less. However, they can keep many, many months this way so it makes for a good alternative if you wish to avoid dehydrating the grains. It may take a few batches to fully reactive them. If you're taking a year long+ break dehydrating may be better for the situation. You can always use a combination of methods for back-up, too.
Recipes
 Visit our new recipe section for flavoring ideas and turning your kefir into tasty smoothies, italian sodas, sparkling juice drinks and even using it as a leavener in bread and pizza!