Live Sourdough Guide
 Welcome to the centuries-old tradition of sourdough! If you haven't already, you can purchase a Sourdough Starter from our store. You are now part of an ongoing world-wide community that supports nourishing, delicious time honored foods passed down through the history of humanity.
This sourdough starter is live, awaiting your immediate care to feed and bake with it! Upon arrival please put it in the fridge until you are ready to begin feeding (evening feeding is best). If you can't get to it the first day, keep the live starter in your fridge for a max of 3 days before feeding.
Most fermentations, including sourdough, can interact and be damaged by metal utensils or metal containers. It is recommended to stick with glass, wood and plastic when handling and fermenting. Stainless steel is considered safe for short term contact such as stirring.

QUESTIONS: If you have any questions at any time just use our contact form or email us at yemoos@yahoo.com. We will be happy to assist you as best we can!
 The special tracking card with your order serves as an accompanying aid for the steps listed in our guide below. Under 'Day 1' you will find more information on how to use it.
*For damaged or misplaced cards, you can view and print a replacement card.
Other Sourdough Material
After going through this guide and activating your sourdough, you may find these additional materials (tips, troubleshooting and other fun info) to be of some help!
Also check out our Sourdough Home Page which includes these pages along with more pics, resources and video guides.
What is Sourdough?
Sourdough Fun Facts
Sourdough Dictionary
Sourdough Picture Guide and Interpretation
Preparing Your Starter Before Baking
Feeding, Vacation & Storage of Sourdough
Starter Troubleshooting
Baking Troubleshooting
Baking Conversion Chart
Sourdough Recipes
Sourdough Varieties of the World
Some additional fun items you may use if you wish!
Sourdough Monthly and Daily Feeding Calendar/Tracker
Sourdough Note Paper
Sourdough Blank Recipe Cards
Baking Conversion Chart
PREPARATION - Tips Before You Start
• It may be best to plan to do this on the weekend (maybe start on a Thursday) when you will be around the home.
• Read through this prior to starting to get an idea ahead of time of what supplies and ingredients will be needed each day.
• A note on metal: It's best to avoid metals when working with sourdough, especially aluminum and copper which can react harshly with the microorganisms. Stainless steel is fine to use for mixing or when making bread, but choose glass, porcelain or a food-grade plastic for storage.
• Sourdough is a living thing and as such, is a learning process. Just like a pet or plant, it will behave differently with different temperatures, climates, flours, etc. You will soon learn its subtle rhythms and preferences just through simple day by day observation. You can even give your sourdough starter a name like many others do!
• As detailed as this may look, there is no need to feel intimated or worried, as long as you care for it, it will live! We just want to make sure you have a lot of good info on your hands! So just relax and have fun with these miraculous little microorganisms! :)
• You can bake with this starter once it is activated, in about 5-10 days! Once it's active it will be ready to be used in baking or if you chill it, within 3 quick feedings (which can be squeezed into 1 day).
SUPPLIES
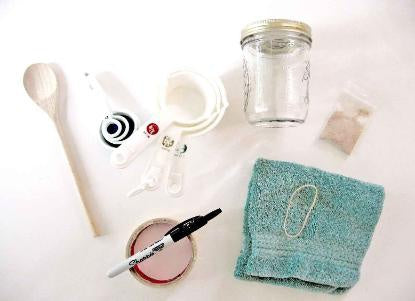
• a clean, clear (to watch more easily) glass, plastic or ceramic jar or bowl or tall cup (that can hold at least 2 cups; this little starter will need room to grow!)
• a wood or plastic spoon to stir
• measuring spoons and cups (a scale can work, too)
• a room that has a fairly stable temperature (68-85°F), it's ok if it gets cooler at night, but it may take longer to activate.
• masking tape, a marker, or a rubber band (for marking purposes - not necessary, but helpful)
INGREDIENTS

• The Starter (bag contains extra-don't use it all!)
• Flour Whole wheat (or brown rice if using our gluten-free starter) is best. Have at least a pound or two on hand. You may try all-purpose flour but *do NOT use any flour with added yeast such as self-rising flour. **Whole wheat, whole spelt, brown rice or rye are a better option than all-purpose (white) when starting out because the added nutrients assist the yeast and bacteria to get a better 'jump-start'. You can later switch to all-purpose if desired though, after the starter is active and strong.
• Water In our observations this starter thrives just as well on tap, as spring or well water. But if you are unsure and concerned of the chlorine levels* in your tap, it is best to buy bottled water. Carbon-filtered water such as Brita is ok, but it does remove a lot (94% calcium, for example) of the helpful minerals for your starter. Distilled and Reverse Osmosis are not recommended (they are devoid of many essential minerals). Soft water (if your house is on a soft water filter system) can also sometimes be problematic as it takes out a lot of the good minerals for your sourdough. Spring and mineral water are fine.
*You can decrease the chlorine by letting an open container of water sit out a minimum of 6 hours - which will allow the chlorine to dissipate and evaporate. Chloramine, another form of chlorine that may be in your water does not evaporate. Once your starter is active and you have extra to spare you can try feeding it with tap water and see how it responds.
ACTIVATION
DAY 1
1. Take 2 teaspoons /11 grams water and put in jar or bowl. Tepid water, ie 70-76°F, is helpful but cold water is ok too (don't use
hot). Note: Please see above for water recommendations. (steps are pictured below)
2. Add 1 teaspoon / 2.66 grams of the starter from the bag into the water. Stir to distribute in the water. Let the starter hydrate for about 5-15 min. This helps the cells to restructure without trying to feed immediately. Don't worry if you add flour right away, it should still be fine.
3. Add 1 tablespoon / 8 grams of whole wheat flour (brown rice flour for gluten-free). If you want to try using white flour (all purpose), spelt flour, rye flour, or another flour it's better to try these later when its stronger (it's more familiar with being fed whole wheat, and the gluten-free starter brown rice). Do NOT use a flour that has 'rising agents' or any yeast whatsoever; you just want plain whole wheat flour.
This is close to what is called an 'equal parts' or 1:1 feeding ratio of water and flour (by volume, not weight). This ratio can sometimes be too wet for it to rise, in which case it will just bubble at the surface. More on this at a later point. Note: It isn't critical to be 100% accurate, its better to understand the process behind what you are doing. Think of it like feeding a pet or baby; you are more careful about what you feed it and when, until it grows strong and matures (and can eat bigger amounts of food less often). This is just how sourdough works too!
4. Mix in until its evenly distributed.
5. Check to see that it has a pancake batter consistency. The consistency should not be soupy or too stiff to stir. It should just be thick and pasty.
6. Cover your jar/bowl (step 6 below) with anything clean and breathable (cloth, paper towel, loose lid, loose plastic wrap, paper, etc). A tight lid may explode the jar (if forgotten). *A very 'airy' lid may dry out the starter (or let fruit flies in), especially at first when there is just a tiny amount in the jar - if you notice it drying, simply switch to a thicker cloth or a loosely placed lid.
Let sit! Keep it somewhere out of direct sunlight, at room temperature (68-85 F). When it's cold, the starter slows and can go dormant, so warmth is important when activating. Not much can kill a starter, but high heat (90-100+) can kill it. Feel free to stir occasionally with a clean wood or plastic spoon, though it's not at all necessary. Check it in about 24 hours.
• Refer to your reference card that came with the starter. It summarizes the ingredients and steps to be taken each day. On the flip side, you can mark each day what you fed it and when to serve as a self-reminder.
• Check out our mini pic guide for handy pics of the starter and its process and for faqs/troubleshooting/etc throughout your activation!

DAY 2
After about 12 hours, it may show signs of bubbling. By morning it will most likely have deflated, so bubbling might be minimal, you will see more later on. You may even have a layer of water sitting on top of your flour, which is a normal byproduct, called 'hooch'. You can tip it out or stir it back in. Or, if it looks really dry, cover with a thicker cloth or loose solid lid for step 2 today. If you see any signs of tiny bubbles on top or throughout, that means it has begun to activate and 'eat'.
1. Either way (bubbles or not), feed another 2 tablespoons of flour /16 g and 1 tablespoon water. Stir the mixture well. Add a pinch more flour if it's soupy.
2. Try marking where the starter is with some tape, a marker or a rubber band on the side of the jar and see how high it expands above this line in the next period of time).
3. Re-cover. Let sit for about 6 hours (roughly until lunch). When you check on it in between, it may show signs of some bubbling and growing - if the consistency is rightand it's beginning to activate it will look like a giant sponge. If it's a bit thin, then it will look like suspended soda, or a very bubbly surface.
4. After approx 6 hours, it may have doubled or close to doubled and shown some good signs of activity*(see note below). Feed it 1/4 cup flour and 3 TBS water. Let sit until evening, before bed.
*If no activity is apparent yet, give it a brief stir and let sit another 6 hours (check it at dinner, at which point it should have some activity, and you may stir it and feed it the 1/4 cup flour as mentioned above). It's best not to overfeed the starter until it's active. In otherwords, if it's still looking weak after this point, give it 6-12 hours between feedings and just a spoonful or two of flour at the feedings, until it begins to bubble strongly.
5. At this point your starter should be active.* Just before bed, stir and feed your starter 1/2 cup flour and 6 TBS water. You will now have approx. 1 cup of active starter that you may begin to bake with the next morning!
*If it's not active, let it sit another 6-12 hours and see if you notice any signs of bubbling, at which point you can repeat this 2 day process to get it to full strength and activity. If it shows no signs (rare), try a new portion from your backup. If all else fails, just contact us and we'll be happy to help!
6. If you need more starter, simply continue to feed it the same amount of flour and slightly less water every 6-12 hours (so you could take your 1 cup starter and feed it 1 cup flour and approx 3/4 cup water and let it sit out another 6-12 hours and you would have 2 cups starter at that point, and so on). Please read the notes below on ratios and future feedings for how to feed and store your starter from here on out. Below you'll find continued maintenance and care, baking tips and recipes! Enjoy! :)
It's worth mentioning that some people recommend feeding for a week or two more to 'establish' it and strengthen it a bit more before baking and storing it in the fridge. This is not completely necessary though. Your starter will still be just fine either way. You can continue to feed it daily indefinitely on the counter as some people like to do, but the vast majority store their starter in the fridge between baking (it must be fed once a week). The only benefit to not storing in the fridge is that your starter will be on hand immediately for a recipe, and sometimes it can be more sour when held at room temperature and fed often ('often' being 1-3 times daily).
Feeding Note: Whenever you feed now, you want to at least double the starter by volume to give it enough to eat. For example, this means if you have 1 tbs starter you want to feed it at least 2 tbs flour and 2 tbs water (even a larger ratio such as 1 tablespoon starter and 1/4 cup flour is a good ratio when its active).
Side Note: To avoid using exponential amounts of flour, you can simply take one tablespoon of you well-stirred starter, discard the rest, and feed it 1/4 cup flour and slightly less than 1/4 cup water each time you feed it (this is a 1:3:4 ratio* which is explained below). I know, we hate to dump it too (once it's established and doesn't have any funny aroma, you can keep this excess to stick in recipes like waffles or cakes so don't worry, think of it as a very temporary waste!) It does make a good craft glue in a pinch too!
*Note on ratios: Many ratios are used within the world of sourdough, but this is a great basic ratio to use until you understand what others are used for. This means 1 part starter : 3 parts water : 4 parts flour. We like to use 1 Tablespoon starter and feed it 1/4 cup flour and slightly less than 1/4 cup water. This is more than doubling it. This ratio gives it some time to eat before you need to feed it again. You can usually get away with a morning and evening feeding with this ratio, especially if your home is cooler through the night. It also is easier to see the volume double with the thick consistency of this ratio. This is also a perfect ratio for feeding it once a week if storing it in the fridge (more about this under 'Long-Term Maintenance and Care'). A smaller ratio will make for a hungry starter that needs to eat more often (as in a 1:2:2 ratio). A smaller ratio is ideal for building a starter before baking, when it's ideal to let it eat often and build quickly (makes for a more vigorous starter for the bread).
Now that you are finished, you can stick it in the fridge, bake with it, or continue to feed it out on the counter! See below for continued maintenance, baking and storage tips.
That's it! Congratulations on activating your starter! You are now ready to bake!!
Long-Term Maintenance and Care
Fridge Storage
Once the starter is completely activated you can stick it in the fridge to slow down its fermentation. Simply give it a 1:3:4 or even a 1:4:5 feeding (for example, 1 tbs starter, 4 tbs water and 5 tbs flour). Store it in a clear roomy jar in the fridge with a tight, or slightly loose lid (either way is safe). If you are worried about it bursting the jar, you can leave the lid loose, wait until it's chilled and then tighten the lid completely the following day. This shouldn't be necessary, though (we've never had to do this). It's helpful to mark it with tape or a rubberband so you can gage when its doubled/peaked and started to deflate in the fridge (it will still go through its whole eating process, just at a MUCH slower pace). Most starters seem to get to about 6-10 days before needing another meal. Once it has deflated completely back to the starting line, its time to feed within a 3 day window of that point. It may even develop a little hooch (it got this name from when it was actually drank as a poor man's alcohol back in the day! It usually appears as a clear purple/black liquid). This is ok, just stir this back in or dump it out if you prefer, and feed your starter. Then stick it back in the fridge following the same process! It's helpful to make the feeding part of a routine, like when you water your houseplants etc each week, like every Sunday.
Long-Term Storage
Dried starter can be kept in the fridge or cupboard up to 6 months or longer. You can also stick your active or dried starter into the freezer for up to 6 months if you need a break or want to make some back-ups! Freezing liquids can cause cellular damage so the safer way to keep it viable is to dry it first, then freeze it. Or you can try burying it in fresh flour and freezing it, too. To dry a starter, simply take some starter that is active (has just reached or barely passed its peak during a feeding) and spread it very thin on some clean parchment paper (*if it's a bit thick, add some water to thin it and make spreading easier). Let it sit out until it's completely dried (6-48 hours).
Ready to Bake!
Now you are ready to discover just what this amazing little starter can do to a piece of dough!
What To Know Before Baking
When you want to bake with sourdough starter, the most important thing is to have an active starter. The best time to bake is when a starter is at its peak during its feeding (before it starts to deflate).
Having an active starter is naturally part of the process, because you will most likely need to build your starter to the amount that you need in a recipe, therefore you will have it out on the counter, feeding it over the course of a day or two.
If you are baking right after activating your starter, you are good to go! Otherwise, preperation is achieved by taking it out of the fridge, feeding it 1-3 times and then using it within 3 days (keep in fridge until ready to use). For example, you could give it a feeding Tuesday noon, Tuesday night, again Wednesday morning, then use it right away or stick it in the fridge and bake with it on Friday or Saturday morning. Another example would be to feed it Friday morning, then Friday night (leave it sit out overnight) and bake with it Saturday morning. Here is a page devoted to explaining this: Refreshing Your Starter Before Baking.
Either way, you will usually need to expand your starter to at least triple its original size before baking with it, to keep it from being too sour or over-ripe. This will also give you plenty to work with (some recipes call for a couple cups. Be sure to reserve some of your mother starter (don't use it all!) and replenish it (and stick it back in the fridge) after you've taken out what you need for your recipe! For example, if you take out 1 cup of starter, put back in 1 cup flour and 1 cup water.
In order to triple its size, simply keep all your starter each time you feed. For example, if you start with 1 tbs starter, and feed it 1/4 cup flour and a little less than 1/4 cup water, next time you will need to feed it almost a cup of flour and water following the same 1:3:4 ratio! It will build quicker than you think! You will get the hang of about how much to feed without creating too much excess, but in the meantime just save any excess to make some easy delicious waffles or pancakes (refer to recipe at the bottom of this guide!).
If you need to use the fridge while feeding your starter before baking, refer to: Refreshing Your Starter Before Baking.
Baking Tips
Spraying oil: spray oil to keep bread from drying out while it rests and rises (if it dries out, the tough dry outer layer will inhibit the rising). If you don't have a sprayer, just rub some oil on your hands and then rub all surfaces of the dough ball.
Dusting: Use flour to dust the dough when you work with it and round it and shape it. This helps to keep it's shape and keep from sticking to you! Dusting the pan with coarse flour gives the bread nice texture but more importantly helps to keep it from sticking, too.
Scoring: take a razor thin blade and make 1/4 to 3/4 inch deep slices in the bread top (tic tac toe or simple flower/pie pattern) to control and allow the steam/pressure to break through at these points. This is not necessary, the bread will choose its own points to break through (just doesn't look as 'pretty').
Altitude: Bread will rise faster at higher altitudes and need higher temperatures and slightly longer cooking times to achieve the same results. Typically about 15 degrees hotter and 15-20 minutes longer, but this varies and is best left to your own judgment and oven. Since it rises faster, the flavor doesn't have as much time to develop. You may find retarding the dough (putting it somewhere cold, like in the fridge, for 12 hours) to be your best option! High altitudes sometimes requires slightly more water as well. Each recipe you do will give you a good idea of what to do next time as far as adjustments, so don't sweat it too much! The bread will still be delicious and edible even if it isn't 'perfect'!
Steaming: This is a fun and easy technique to simulate a professional oven at home to get a thick crunchy crust. You can do one of two things. You can take a spray bottle, and during the first few minutes of baking, open the door and quickly spritz water everywhere to create lots of steam, then close it up 30 seconds, open and repeat (this is for bread that is not covered with a lid). You can also put a pan in the bottom rack and when you stick your bread in at the start, you can pour in a cup of hot water into the pan, close the oven, and that will generate lots of steam for the first couple minutes as well. Don't spray the oven light, it can burst. To create steam without fuss, simply baking bread inside a dutch oven (with a knob/handle thats oven-safe over 400°F) or clay baker will nicely do the trick. Romertopf, Sassafras and La Cloche are the recommended clay bakers that many home bakers rave on about, as they produce superior bread and crust.
No two breads are perfectly alike! Factors such as your oven, the humidity, climate, temperature, activity of your starter, time involved and the recipe itself all contribute to the outcome. So don't worry, just have fun and learn as you go- all bread is delicious and edible no matter what it looks like! Even if you are overwhelmed by recipes, steps etc (but still wanting sourdough bread!) and just threw starter, flour and water together without a recipe you'd still end up with some form of edible yummy bread. You can make baking as simple or complicated as you desire! The more you bake, the closer you will get to what you are after as far as flavor, shape and crumb!
In summary, here are the 8 basic steps in making sourdough bread from a sourdough starter (as featured in The Bread Bible )
1. Feed (refresh) some of the sourdough starter for future bread
2. Feed (expand) some of the sourdough starter for the bread you are making
3. Feed (expand) a second time
4. Mix the dough (mix the starter into the recipe)
5. Let the dough rise
6. Shape the dough and let it rise again
7. Bake the bread
8. Cool the bread
Recipes
• Whole Grain Sourdough
• No-Knead Whole Spelt Sourdough
• San Francisco Sourdough in Bread Machine
• Gluten-free Sourdough
• Sourdough Breadsticks
• Pizza Crust
• Authentic Sourdough Waffles
• Traditional Sourdough Pancakes
• Sourdough English Muffins
• Sourdough Bagels
• Polish Cottage Rye Sourdough
• Sourdough Apple Streusel Muffins
• Old-fashioned Donuts
• Sourdough Chocolate Chip Cookies
• Sourdough Old Fashioned Cinnamon Buns
• Cheddar Cheese Bread
• Country Corn Bread
• German Christmas Bread
• Myrtle's Sourdough Chocolate Cake
• Sourdough Banana Bread

These are two of our favorites on one convenient recipe card. Both are great for starting out. We have formatted it to print as a recipe card, making it perfect to stick in your favorite recipe box or album!
View and Print this recipe
View and Print this recipe for Gluten Free