Dried Milk Kefir Guide
 Welcome to the kefir family! If you haven't already, you can purchase Milk Kefir Grains from our store. You are now part of a world-wide community that has sustained this delicious health-promoting drink for over 2,000 years.
Most fermentations, including kefir, do not do particularly well with some types of metal utensils or metal containers which can damage them.
It is recommended to stick with glass, wood and plastic when handling and fermenting. Stainless steel is considered safe for short term contact such as straining or stirring.
View the printable PDF version of this guide.

PREPARATION

 *When your package arrives, we recommend putting the grains in your fridge, until you're ready to feed them. Dehydrated kefir grains can last quite awhile, but are best within 6 months.
Utensils needed:
• Pint or larger jar
• Wood or plastic spoon
• Plastic/nylon or stainless steel strainer
• Another pint-size or larger container to store the finished kefir in
Ingredients needed:
*When buying organic - check the cartons carefully, many are ultra-pasteurized.
**Hold off on experimenting with other milks such as canned, almond, soy or coconut until the grains have balanced in their new home for a few weeks.
STEPS
 1. When you are ready to start making milk kefir, place the dried kefir grains into a clean jar. It doesn't really matter whether it's a skinny or a wide jar, but we have found that the kefir grains do a little bit better in a wide jar simply because they can breathe better.
For this first batch, add about 1/4 cup of milk (refer to ingredient section above for type of milk to use). They will spend their first batch primarily rehydrating and 'waking up'. Each subsequent batch may require more milk, as they become more active. Every environment is different, so refer to step 4 at that point, to know approximately how much milk you should use.
 NOTE: The first batch will not ferment the milk (it won't thicken or form pockets of whey). On the second or third batch you will start to see the milk thicken and possibly separate into curds and whey at the end (which is the natural process of kefir).Your grains will still require further batches to fully balance. Dried grains tend to be 'milk-greedy' after awakening and trying to re-balance, so you may notice it cruise through 2+ cups of milk until it calms down a bit (in a week or two). We recommend waiting until this point for consumption, when it's balanced and settled. From here on out the batches should get better as they go. Keep in mind that it can take a couple weeks or so before the grains start growing (they can produce good kefir far before they start to grow).
 2. Cover the top of the jar with a cloth, paper towel or parchment paper held by elastic. This is so your kefir grains can breathe while at the same time protecting it from contamination.
Note: Putting a tight lid could cause the jar to explode due to the natural carbonation process taking place. A loose lid is ok, but creates a lot of trapped moisture.
3. Time to let them rest and do their thing! Find a place for your grains out of direct sunlight. A cupboard is just fine. It is not necessary to shake/stir them while fermenting unless you feel after observing the first batch that they are fermenting too slowly. Kefir grains that are stirred ferment faster because it redistributes nutrients for easier access. There is no hard rule for this, if you want to shake or stir, go for it!
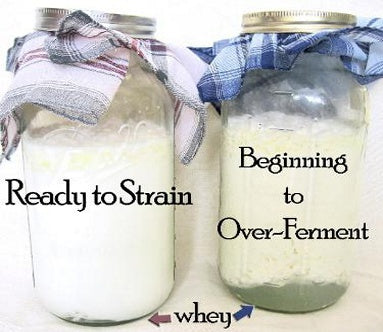 4. When its been 24 hours, though it will still most likely be just milk, it's time to strain the grains. In a few days the milk should become kefir in about 24 hours. You can tell when it's kefir (and ready to strain) if when you slightly tilt the jar you see it is more like gel, buttermilk or gluey (no longer watery milk), and also if you see any separation of the whey (pockets of clear liquid).
It should eventually smell yeasty like bread, and a little sharp or sour like yogurt. How long you ferment is truly a matter of personal preference. It gets more acidic and tart the longer you let it ferment. Keep in mind it can stress the grains when over-fermented continually.
Temperature and stirring will also greatly affect the speed of fermentation (it can take half as much time during the summer or if stirred). Experiment and see what tastes right (and digests right) for you. There is no right or wrong to this, it is simply a matter of preference!
NOTE: Occasionally, a first batch will have an off odor. And it may be a bit weak still as it adjusts from transit and acclimates to a new environment and milk source. Although generally safe, you may want to discard this batch. It may take a few batches for the grains to acclimatize to your home and milk source. At this point, it will be more balanced and tasty for you to consume.
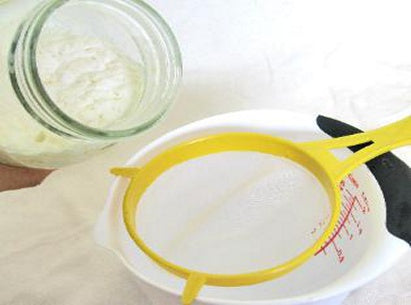 5. To strain the grains from the milk, set a plastic or stainless steel strainer over a jar or bowl and pour everything in. The first batch will pour straight through. As they activate it will become creamier and thicker, requiring a spoon and wiggling the strainer a bit to get all the kefir through (as pictured below).
NOTE: Some metal (like aluminum) may harm the kefir grains. Stainless steel is considered safe (non reactive) and is perfectly suitable for brief contact like straining or stirring.
It's normal to see the grains in a sort of 'mass' near the top, just as pictured to the left - they tend to float along with the cream towards the end of the ferment. Also keep in mind any 'curd' that turns to liquid when pressed is just a milk curd, not a kefir grain - the grains themselves are very solid rubbery masses that will not pass through a fine strainer (unless very forcefully and purposely mashed through).

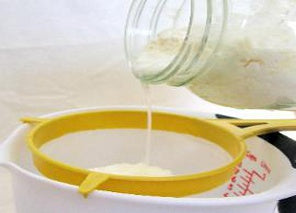 Some people will discard the clear whey that can sometimes pour through the strainer first (pictured to the right) so they can have a thicker, milder kefir, however it contains many nutritious minerals and proteins from the milk, and is best left in if you want the full nutritional benefits.

 You can use a wooden or plastic spoon (or spatula) to gently help the liquid kefir move through. Although it might seem very thick to strain, gently stirring the kefir and grains around in the strainer (and swirling the strainer itself) will get the job done surprisingly fast. If you still have trouble, dip the strainer into the bowl so the grains are re-coated with kefir liquid and try again!
 6. Put the grains back into the jar. It's not necessary to rinse the grains or the jar; they are usually much better off without a rinse. You can re-use the same jar or start with a clean one. If you clean it, make sure to wipe all soap residue out (to avoid harming the grains with any harsh chemicals or antibacterials).
 7. Once the grains are producing kefir you can take your strained kefir and stir to smooth out any chunks. You can drink the finished kefir right away or you can put it in a jar (as pictured to the left) in the fridge to cool, round out the flavor and thicken a bit more. B-vitamins also increase slightly when stored for 6-12 hours before consuming. If you want your kefir fizzy and carbonated, put a tight lid on the finished product for a day or two, burping it once a day (opening and closing the lid - to prevent explosion). Keeping it outside the fridge will help this process, but keep in mind, it will get increasingly sour.
 Important Note Before Drinking Kefir: Kefir contains very large amounts of good bacteria and yeast as well as being acidic (from the high amounts of healthful lactic acid, ph around 3-5). For a few people's bodies it can be a little bit of a shock. Everybody reacts to it differently, so we always recommend starting out slow to see how your body takes to it. The majority of people do not have any adverse reaction, but if you do, usually it's just a matter of starting out slow and slowly increasing over time. Start out with a tablespoon and go from there. Your body can ultimately benefit more from it too, when introduced to it gradually. Sometimes drinking in the morning with breakfast is best as many report that they do much better with Kefir in the morning.
NOTE: When people say they are drinking kefir, they are referring to the liquid created. However, it is fine to eat small amounts of the grains themselves, too, which are of course an excellent source of probiotics.
 10. Now repeat! Pour in the fresh milk to start the process all over again. That's it! Congratulations on your first home-made kefir! It really is a fool-proof process and the grains are quite resilient, so don't worry too much, people have been doing this for thousands of years! Have fun, experiment and enjoy!

If you need any further help beyond this guide, feel free to email us at any time at yemoos@yahoo.com.
Extra Grains and Storage
After your first few batches:
As you continue to make kefir, your grains will grow. At that point, you can either add more milk if you want more kefir, eat them or store them (it's always a good idea to have some back-up grains on hand). They also are a good addition to a compost pile! :)
Eating the grains is another way to get a mega dose of probiotics. Start with a very small amount of balanced, healthy grains and see how your body responds. They taste very pleasant like a sour gummy candy. We love eating them ourselves (as do our dogs and chickens!). You can also blend them in with your kefir or kefir smoothies (throw in some bananas and strawberries for fun!). Everyone is different and some people may be sensitive or not quite use to the sheer number of good bacteria and yeast contained in the grains. As with all things, listen first to your body.
How to store your extra grains:
Freezing - best for medium to long term storage
To freeze, rinse your grains if you wish with water (no chlorine, no heat) and then gently pat them dry with a clean cloth or paper towel. You can take them directly out of a finished batch of kefir and just pat them dry of kefir (they will be more sticky, but rinsing is not absolutely necessary).They will still be damp, now take them and roll them in a bowl of dried milk powder until well coated. Then fill a freezer bag or jar with a generous amount of milk powder and bury them in it (to protect them from air, moisture and freezer burn). You can also try freezing them directly in a milk-filled jar, but it is more damaging, since the water in milk expands as it freezes. If you want to freeze multiple batches of kefir grains in milk, simply place a few grains in each cube of an ice cube tray, fill with milk and let freeze on a flat surface. Then pop them out into a freezer bag within a day or two and store for about 3 months. Dom, a kefir-guru recommends grains spend no longer than six months in the freezer. However, some have had success reconstituting frozen grains after more than 2 years (though we can't say what the quality or health of the grains were at this point!).
If you have a self-defrosting freezer, you can try freeze-drying your grains at home. Try to start with small grains of uniform size (use scissors to make large grains smaller if necessary). Place your grains on a porous, non-metal surface, such as some nylon suspended above a cookie sheet. Allow them to freeze openly in your freezer for about 3-5 days. This will only work in a self-defrosting freezer that is able to wick away moisture as they freeze, allowing them to dry. When they are dry, store them buried in milk powder in the freezer (in a jar or bag) or in a vacuum-sealed bag.
Dehydrating - best for long term, convenient and/or transportable storage
1. Pat your kefir grains dry with a clean cloth or paper towel. You may rinse them ahead of time if you wish In chlorine-free water.
2. Lay out on a clean surface. A cloth or paper towel works well for non-fan drying, a plate, wax paper or any clean surface (non-metal) works fine for forced air drying. Skip to step 5 if you have a fan or dehydrator.
3. If you don't have a fan, cover loosely with paper towel to protect them as they dry, this will take about 2-5 days, depending on room temperature and humidity.
4. Check them as they are drying, flipping them around half-way to expose the damp parts near the bottom.
5. If you have a fan, lay them out as mentioned in step 1 and angle a low or medium force of air towards them (just be careful not to blow them away!). If you have a dehydrator that can do 80°F or less, than this is an acceptable method as well. They will dry in about 12-48 hours, depending on room temperature and humidity.
6. You can stop the drying when they appear almost dry but are still barely squishy if you are storing them for a short period of time (such as a week or two). They are slightly more active and fresh in this state. Otherwise proceed to step 7.
7. When the grains are completely dry (hard, small, yellowish) put them into a plastic bag or jar with cotton balls (to absorb excess moisture) and store them at room temperature or in the refrigerator. You can also store them in a paper envelope, inside a jar OR coated in milk powder in a bag or jar. Dehydrated grains can successfully be reconstituted after a year or more.
Refrigerating - best for temporary storage
If you need to store them temporarily, you can always put them in a little fresh milk in the fridge. The colder temperature will slow down the fermentation process for at least several days. This is the best method of storage if you're planning to take a break of about a month or less. It may take a batch or two to fully reactive them. If you're taking a longer break, dehydrating is recommended.
Recipes
 Visit our new recipe section for flavoring ideas and turning your kefir into tasty smoothies, italian sodas, cream cheese and even using it as a leavener in bread and pizza!